Removal of rusty wire
from ceramic bottle caps
For this work I
carved the shape of a ceramic beer bottle cap out of a piece of
timber.
The shape nicely fits a ceramic cap (Fig. 1). Exactly at the
position
of the hole of the ceramic cap there is drilled a hole into the
timber
within the carved mold. By repeated use the mold even better fits
to
ceramic caps. Ceramic caps differing significantly in their shape
require a separate mold to be carved out. The most important tool
to
finally remove the rusty wire from old ceramic caps are pin punchs
(pin
removing tools) of different sizes (Fig. 2), which can be bought
in
hardware stores. The diameter of the pin punches should not be
greater
than the diamter of the hole in the ceramic caps (Fig. 2).
Ceramic caps from the U.S.A. usually have no round shaped holes but triagle-shaped holes. I have no exprience with removing rusty wire from such ceramic caps and I am not sure if the method described here also works for US ceramic beer bottle caps.
Ceramic caps from the U.S.A. usually have no round shaped holes but triagle-shaped holes. I have no exprience with removing rusty wire from such ceramic caps and I am not sure if the method described here also works for US ceramic beer bottle caps.
Fig.
1
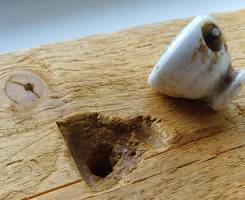
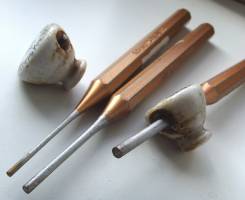 Fig. 2
If the rusty wire
does not move even after several forceful punches with a hammer
(Fig. 5
shows a rusty wire which just starts to move), one can try to
treat the
rusty wire some rust remover solution. It is best to apply the
rust
remover only onto one side of the rusty wire and then wait until
it
appears at the opposite side of the hole of the ceramic cap. This
ensures that the rust remover went through the whole ceramic cap.
Then
you try again, if you can punch out the rusty wire. In most cases
the
rusty wires can be removed without rust remover. Some can only be
removed with the help of rust remover and in a few cases it will
not be
possible to remove the rusty wires. In general when using this
method
only very few ceramic caps will break.
Using a pincer
you first should pinch off any protruding wire. Subsequently
remove
from one side of the hole of the ceramic cap as much rust as
possible
down to the smalles diameter of the hole of the ceramic cap. This
can
be done for example using a small screw driver, such as the ones
used
by clockmakers. Fig. 3 shows this exemplarily by depicting a
broken
ceramic cap containing a rusty wire.
 Fig. 3
During this work you should take care, that at the back of the ceramic cap the punched out rusty wire fitts into the hole drilled into the timber mold. Also the pin puncher used should not have a diameter bigger than the diameter of the hole of the ceramic cap.
Fig. 5. shows the back side of a ceramic cap treated as descirbed above. You can see, that the rusty wire has already been pushed out a little bit out of the hole of the ceramic cap.

 Fig. 5
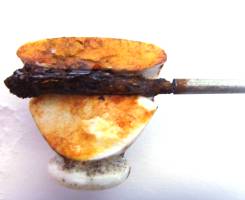
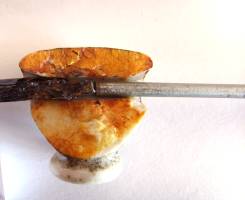 Fig. 7
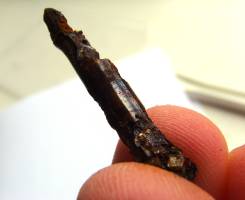 Fig. 9
Removl of rusty wire has several advantages:
- The ceramic cap looks nicer
- Sharp-edged rusty wires no longer can scratch other ceramic caps
- Continued over time accumulation of rust no longer can result in bursting of the ceramic cap